리액트 _3 _for문
<실습1>
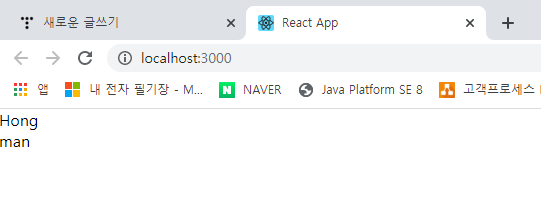
index.js 에서 태그로 변수를 쓰고 출력해보자
ReactDOM.render(
    <App name={"Hong"} sex={"man"}/>,
  document.getElementById('root')
);
app.js로 와서 {this.props.ㅇㅇㅇ}로 입력하면 위에 태그에 입력한 값이 출력된다.
class App extends Component{
    constructor() {       //선택 입력
        super();          // 멤버 변수 선언, 이벤트 등록시 사용
    }
    componentDidMount() { //선택 입력
                          //데이터를 서버에서 전송 받거나, JQUERY 연동시 사용
    }
    render() {            //필수 입력
                          //화면 출력하는 역할
       return(
           <Fragment>
               <div>{this.props.name}</div>
               <div>{this.props.sex}</div>
           </Fragment>
       )
    }
}
결과)
<실습2- 만개의 레시피 DB이용>
1.robo3t를 실행한다.
2. 디비ip입력을 하고 connect 한다.

3. 이렇게 디비가 있는 것을 확인할 수 있다.

<실습3- 지니뮤직 DB이용>
4. music.js를 만든다.

이제 이 곳에다가 작성을 해야하는데 일단 라이브러리 연동을 해보자
5. package.json에다가 "jquery": "^3.5.1", "jquery-ui": "^1.12.1" 를 추가해준다.

6. 메인에다가 music을 임포트 해주고 호출한다.

7. const(상수형 변수)로 해서 속성값으로 안에 데이터를 넣어준다.
Music을 호출해준다. 값은 const로 해놓은 것을 넣는다.

!참고!
ES 5.0
  var  ==> 사용범위가 명확하지 않다.

ES 6.0
  let   ==> 사용범위가 명확하다(주로 이걸 사용한다.)
  const ==> 상수형 변수

  화살표함수  => function, return 생략가능
  ex) window.onload=funtion(){}   ==> window.onload=()=>{}
8. index.html안에 부트스트렙 링크를 넣는다. div의 class이름도 만들어준다.

9. music.js에다가 이렇게 코딩을 한다.
const html로 해서 for문을 만들어준 형태이다. tbody 부분안에다가 변수 호출({html})을 해주면 많이 출력된다.
import React,{Component} from "react";

class Music extends Component{
    /*
    *
    *  var a=[]
    *  var a={no:1} => a.no라고 써야한다.
 */
    render() {
        const html=this.props.music.map((m,index)=>    // index.js가 넘겨준 music 변수임
            <tr>
                <td>{m.rank}</td>
                <td><img src={m.poster} width={"35"} height={"35"}/></td>
                <td>{m.title}</td>
                <td>{m.singer}</td>
            </tr>
        )

        return(
            <table className={"table table-hover"}>
                <thead>
                    <tr className={"danger"}> {/*danger: 빨간색*/}
                        <th>순위</th>
                        <th></th>
                        <th>곡명</th>
                        <th>가수명</th>
                    </tr>
                </thead>
                <tbody>
                {html}
                </tbody>
            </table>
        )
    }
}

export default Music;
결과)
***보안성이 뛰어나서 소스보기하면 소스가 아무것도 없다.

+ 입력창 추가
class Music extends Component{
    /*
    *  this.props.music ==> index.js가 넘겨준 music 변수임
    *
    *  var a=[]
    *  var a={no:1} => a.no라고 써야한다.
 */
    render() {
        const html=this.props.music.map((m,index)=>
            <tr>
                <td>{m.rank}</td>
                <td><img src={m.poster} width={"35"} height={"35"}/></td>
                <td>{m.title}</td>
                <td>{m.singer}</td>
            </tr>
        )

        return(
            <React.Fragment>
            <table className={"table"}>
                <tr>
                    <td>
                        <input type={"text"} id={"keyword"} size={"20"}/>
                    </td>
                </tr>
            </table>
            <table className={"table table-hover"}>
                <thead>
                    <tr className={"danger"}> {/*danger: 빨간색*/}
                        <th>순위</th>
                        <th></th>
                        <th>곡명</th>
                        <th>가수명</th>
                    </tr>
                </thead>
                <tbody>
                {html}
                </tbody>
            </table>
            </React.Fragment>
        )
    }
}

export default Music;
<React.Fragment> 대신 <div className={"row"} style={{"margin":"0px auto","width":"700px"}}> 를 넣어도 가능하다.
import React,{Component} from "react";

class Music extends Component{
    /*
    *  this.props.music ==> index.js가 넘겨준 music 변수임
    *
    *  var a=[]
    *  var a={no:1} => a.no라고 써야한다.
 */
    render() {
        const html=this.props.music.map((m,index)=>
            <tr>
                <td>{m.rank}</td>
                <td><img src={m.poster} width={"35"} height={"35"}/></td>
                <td>{m.title}</td>
                <td>{m.singer}</td>
            </tr>
        )

        return(
            <div className={"row"} style={{"margin":"0px auto","width":"700px"}}>
                <h1 className={"text-center"}>Music Top50</h1>
                <table className={"table"}>
                    <tr>
                        <td>
                            <input type={"text"} id={"keyword"} size={"20"}/>
                        </td>
                    </tr>
                </table>
                <table className={"table table-hover"}>
                    <thead>
                        <tr className={"danger"}> {/*danger: 빨간색*/}
                            <th>순위</th>
                            <th></th>
                            <th>곡명</th>
                            <th>가수명</th>
                        </tr>
                    </thead>
                    <tbody>
                    {html}
                    </tbody>
                </table>
            </div>
        )
    }
}

export default Music;
결과)
위에 제목과 입력창이 생겼다.
